Simulation & Verification are fundamental in the process of developing any good quality FPGA-based RTL codification. These are key steps within SoC-e’s designing procedures, and in this article, we are going to provide more insights about them in our Networking IP Core portfolio.
The whole process is divided into the following high-level steps:
- Entity/Block-oriented simulation: Simulation at entity/block-level for the different modules that compose each IP Core, by generating stimulus on each input signal and verifying that the RTL code behaviour is the expected one.
- Global-oriented simulation: Once the different modules have been validated individually, the next step implies simulating the whole IP as a single UUT (Unit Under Test).
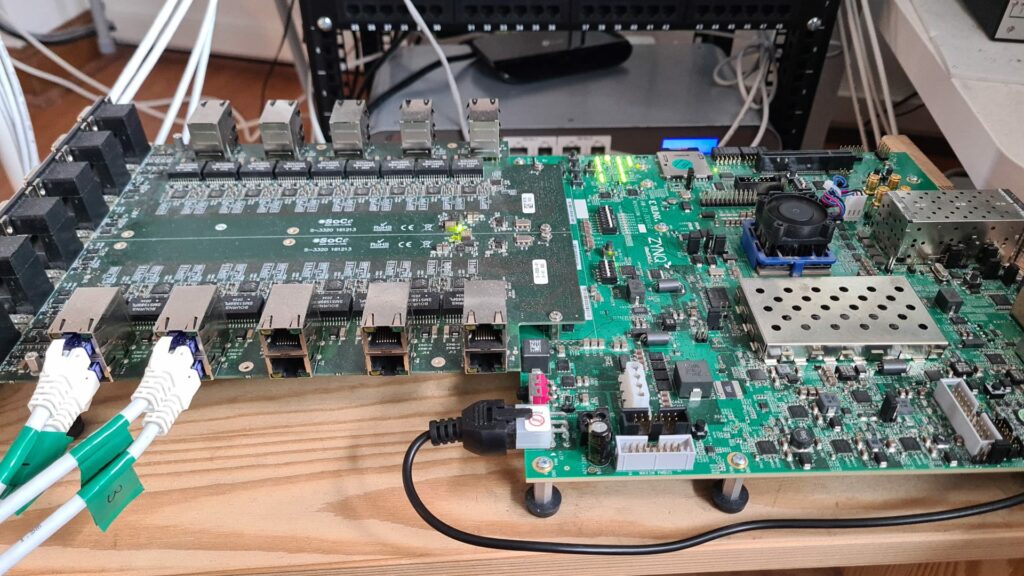
- (On) Hardware testing: Even though an extended simulation plan provides a good level of trustiness, there are still many corner situations that can’t be verified on a virtual environment. For those cases, a hardware-based test plan is required, and also the last step towards a high-quality result.
In this article we will be covering the third and latest step: procedures for IP Core validation on hardware platform(s).
On hardware testing
Testing on hardware is the last step towards a high-quality testing & verification plan for IP Core products. At SoC-e HW testing is divided into the following stages:
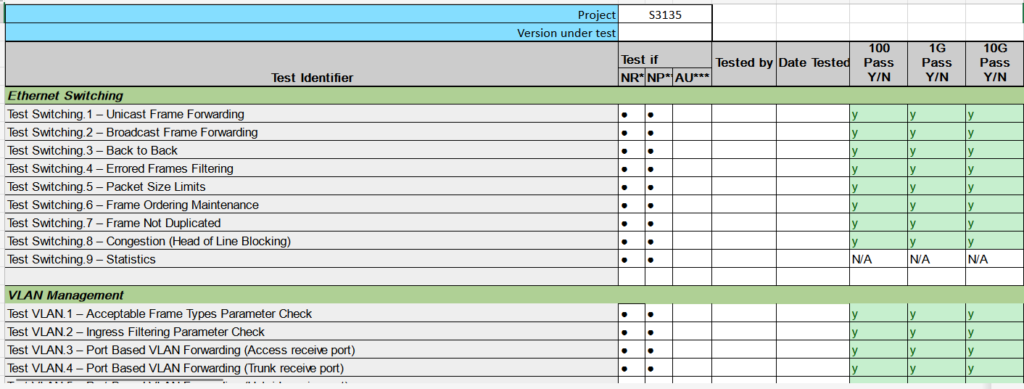
- Test preparation: the purpose of this procedure is to define the necessary steps to be done before the product starts the testing.
At this stage, the Test plan document is defined. In this document, every single test that must be performed over the DUT (Device Under Test) is described in detail.
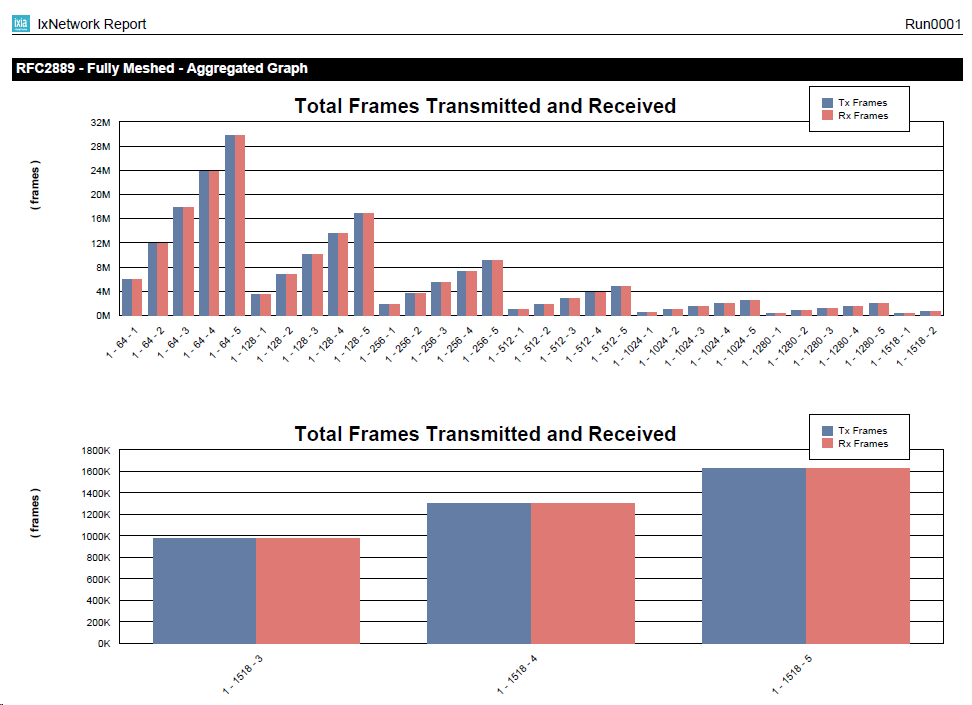
- Test execution: the purpose of this procedure is actually the execution of the test cases defined in the previous step.
- Issue report: the purpose of this procedure is to check & report any issue detected during the test execution.
An Issues spreadsheet is available, where every single issue detected during the testing phase will be recorded. The development team will be reported whenever new issues are registered, and will be able to track down which issues have been solved and which ones are still pending to be reviewed.
- Test closure: the purpose of this procedure is to determine when the test phase has been completed succesfully.
In this last step, a Testing results document is created, which will contain a summary of the succesfully performed test and more relevant information about the test (when was executed, who did the test, etc…).
SoC-e Test tool
With the aim of optimizing the test execution process, we have defined what we call “SoC-e Test tool“. This tool helps to automatize the test execution. The tool considers the following features:
- DUT configuration process
- Traffic injection and sniffing
- Record traffic returning from the DUT
- Verify saved logs
- Set the DUT to the original state
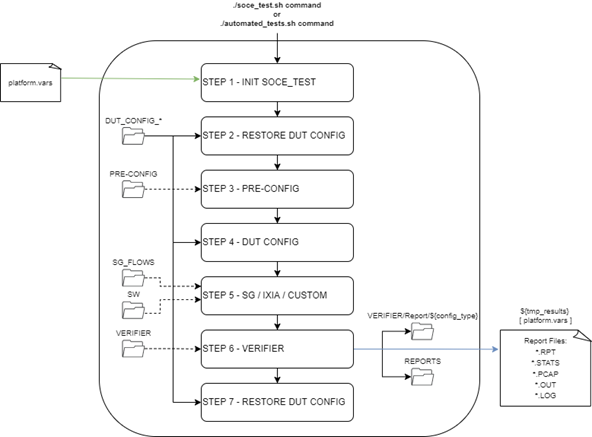
SoC-e test software architecture
The first step in this tool is related to the execution of DUT configuration. This is done with an input configuration file called Platform.vars. Through this file, the user can configure different parameters like DUT SSH parameters, IP address or Network interface of the Host PC.
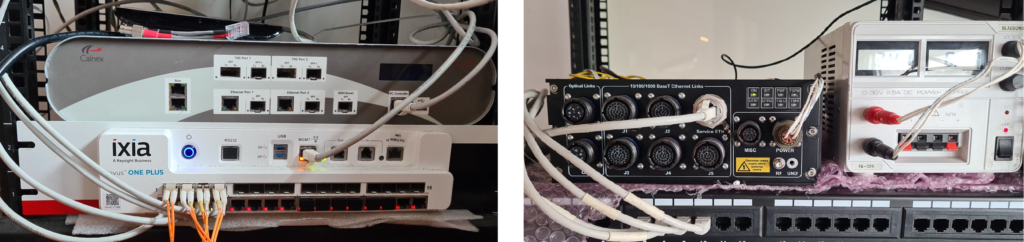
In the second step, traffic injection and sniffing between a TS (Test Station) and the DUT is done. We have different 3rd party devices for using as the Test Station, but one of the most used ones is the IXIA Novus One Plus. Traffic can be easily sent via IXIA’s Python API. Packet manipulation is done through Scapy Python module. Although Scapy allows transmiting all the traffic generated by the tool, it is performed using a different tool, tcpreplay. This allows us to overcome certain limitations in terms of bandwith and accuracy caused by Scapy.
In this step, the test offers flexibility to customize traffic flows in order to validate different DUT functionalities. Scalability is not a problem, as the tool supports adding additional traffic flows and test ports.
When it comes to the third step, the tool registers the traffic comming from the DUT, using the Test Station or via Linux tcpdump software. In the fourth step, SoC-e Test tool verifies stored information (statistics, register dump, etc…) during the previous step, in order to check if everything is fine. With these two steps, the SoC-e Test tool provides a great solution for the verification of test cases.
And finally, the fifth and last step. The main purpose of this last step is to restore the DUT configuration to its original state, as it could have been modified during the testing.